Bringing Back the Backyard: How to Clean and Restore Your Weathered Wood Fence
- by Allfencingandrepair
- November 20, 2026
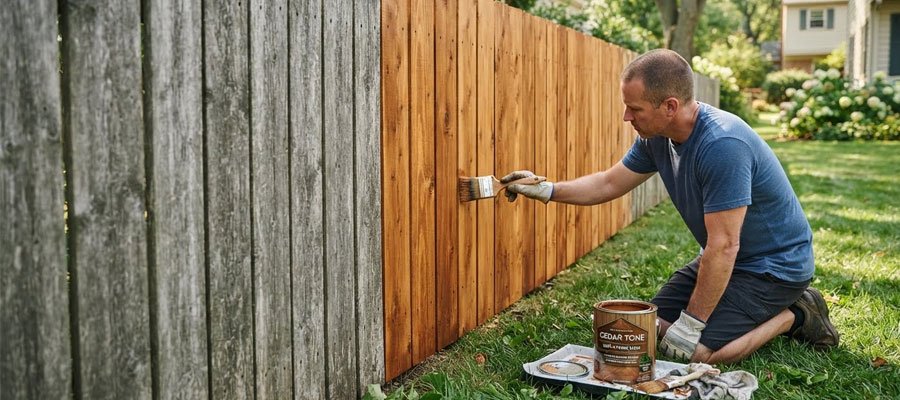
A wood fence does more than just mark your property lines—it frames your yard, protects your privacy, and gives your home warm, natural curb appeal. However, because it stands on the front lines against blistering sun, driving rain, and shifting humidity, even the sturdiest cedar or pine fence eventually starts to show its age. Over time, UV rays break down wood fibers and bleach the surface into a dull, weathered gray, while trapped moisture invites green algae, black mildew, and stubborn grime to settle into the grain.
If your backyard boundary is looking tired, warped, or discolored, you do not need to tear it down and start from scratch. With a weekend of elbow grease, the right cleaning solutions, and a protective finish, you can strip away years of buildup and restore your wood fence to its original golden warmth.
Here is a step-by-step guide on how to safely clean, brighten, and seal your wood fence so it looks brand new and lasts for years to come.
Step 1: Inspect, Repair, and Prep the AreaBefore you break out a single drop of cleaner or turn on a hose, walk the entire perimeter of your fence to check its structural health. Cleaning water and chemicals will only make existing damage worse if the wood is compromised.
- Tighten and replace hardware: Look for popped nails, loose screws, or wobbly gate hinges. Drive loose fasteners back in or replace rusted nails with exterior-grade coated deck screws.
- Swap out rotted boards: Check the bottom of the pickets and the base of the posts where the wood meets the soil. If any boards are split, severely warped, or spongy with rot, replace them now so the new wood weathers and stains evenly alongside the rest of the fence.
- Protect your landscaping: Clear away patio furniture, yard decor, and overgrown weeds touching the fence line. Because wood cleaners can burn delicate foliage, cover nearby flower beds and shrubs with plastic sheeting or drop cloths, and thoroughly soak exposed grass and plants with fresh water right before you start.
Step 2: Choose the Right Cleaning Method
Cleaning a wood fence is about lifting dirt, mold, and dead gray wood fibers without tearing up the soft grain underneath. Avoid blasting the wood with high pressure, which can splinter the surface and leave permanent “wand marks”.
- Apply a specialized wood cleaner: Skip harsh, undiluted household bleach, which can dry out wood fibers and corrode metal fasteners. Instead, opt for an oxygen-based wood cleaner or a sodium percarbonate solution mixed according to the label. Apply it generously from the bottom up using a garden pump sprayer so the solution doesn’t streak.
- Let the cleaner dwell: Allow the solution to sit on the wood for 10 to 15 minutes. Keep the fence damp with a light mist if the sun is beating down, as letting the cleaner dry on the boards will stop it from working.
- Scrub stubborn spots: For heavy patches of green algae, mildew, or bird droppings—especially in damp, shaded corners—scrub gently in the direction of the wood grain using a stiff-bristled poly brush.
Step 3: Rinse Thoroughly (and Safely)
Once the cleaner has loosened the grime and dead gray fibers, it is time to rinse everything away.
- Garden hose method: If you do not own a pressure washer, a standard garden hose fitted with a high-pressure jet nozzle works great. Work from the top of each board down to the bottom to prevent dirty runoff from staining clean sections.
- Low-pressure washing: If you use a pressure washer, keep the setting low—between 1,000 and 1,500 PSI—and attach a wide 40-degree fan tip. Hold the wand at least 12 to 18 inches away from the wood. Move in smooth, continuous strokes parallel to the wood grain, feathering the wand away at the end of each pass rather than stopping abruptly on a board.
Step 4: Brighten and Sand for a Smooth Finish
Many homeowners stop after rinsing, only to wonder why their fence still looks slightly dark or fuzzy once it dries. Two quick finishing steps make the difference between an average wash and a true restoration.
- Apply a wood brightener: If you used a heavy-duty cleaner or stripped away an old finish, apply an oxalic acid-based wood brightener. This neutralizes the pH of the wood, removes dark tannin stains or rust marks around nail heads, and restores the lumber’s natural, vibrant color. Rinse thoroughly after a few minutes.
- Let it dry completely: Patience is critical here. Give your fence 24 to 48 hours of dry weather to air out completely. Trapping moisture underneath a fresh coat of stain will lead to peeling, blistering, and mildew growth later on.
- Knock down raised grain: Cleaning and water exposure naturally cause wood fibers to swell and feel rough or “fuzzy”. Once the fence is bone dry, lightly sand rough patches, splinters, and top rails with 80- or 100-grit sandpaper so your stain goes on smoothly.
Step 5: Seal and Stain to Lock in the Look
Bare, freshly cleaned wood is like a sponge—left unprotected, UV rays and rain will turn it gray all over again within a single season. Sealing your fence locks out moisture and shields the grain from sun damage.
- Pick your finish: Clear water sealers preserve the raw, natural look of fresh wood, while semi-transparent oil-based stains add rich color while allowing the natural grain and knots to shine through. Solid stains offer maximum UV protection and hide mismatched replacement boards, though they look closer to paint.
- Apply evenly: Check the forecast to ensure at least 24 hours of dry, mild weather ahead—avoid staining in direct, scorching sunlight, which dries the stain before it can soak into the wood. Apply your stain or sealer using a pump sprayer, paint roller, or wide stain brush.
- Back-brush for deep penetration: If you spray your stain on, immediately follow up with a brush or roller (“back-brushing”) to work the finish deep into the pores and smooth out any drips or puddles. Work on two or three boards at a time from top to bottom so you always maintain a wet edge and avoid lap marks.
Keep Your Fence Looking Great Year-Round
Once your stain has cured, maintaining your restored fence takes almost no effort. Trim back bushes and vines so air can circulate freely around the boards, adjust lawn sprinklers so they aren’t spraying the wood every morning, and give the fence a quick rinse with a garden hose once or twice a year to wash away pollen and dust. With just a little routine care, your restored wood fence will keep your backyard private, secure, and handsome for many seasons ahead